Use the following instructions to access the Reporting area of Server Backup Manager.
| Note You can access the Reporting window by manually appending the /Reporting/ folder to the Backup Manager address in the browser address bar. For example, enter http://10.61.200.31/Reporting/. Note that the address is case sensitive. |
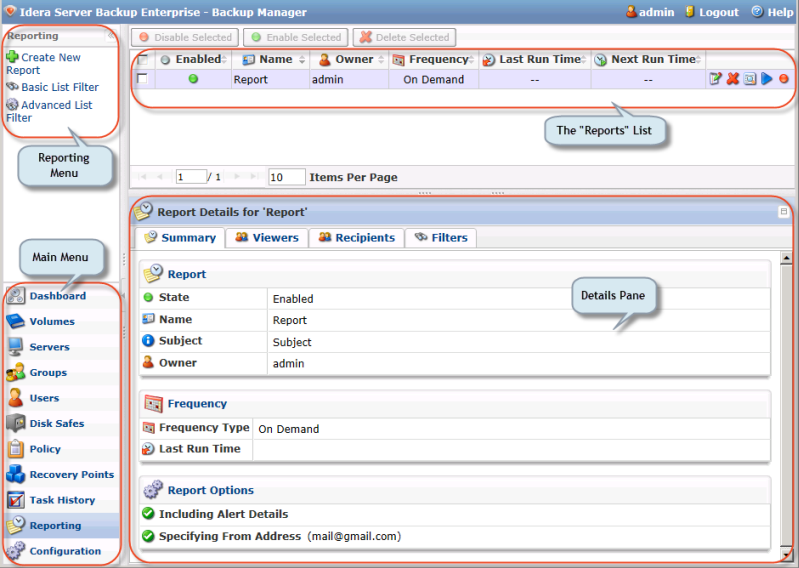
Click Reporting in the Main Menu. Server Backup Manager displays the Reporting window, including the following areas:
- Reporting menu. Provides access to the creating reports function.
- Reports list. Provides a list of all reports added to the system.
- Details pane. Provides additional information about the selected item in the list.
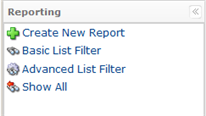
Reporting menu
The Reporting menu provides the following functions:
- Create New Report. Allows you to add a new report to the system. After clicking on this button, you will be able to define the new report properties.
- Basic List Filter. Allows you to customize the view of the Reports list. You can apply the minimum range (most commonly used) of filter criteria. For more information about using this feature, see Customize the Reports list.
- Advanced List Filter. Allows you to customize the view of the Reports list. You can apply all possible filter criteria. For more information about using this feature, see Customize the Reports list.
- Show All. Visible only when a filter is applied. Cancels the filter settings and shows all records in the Reports list. For more information about using this feature, see Customize the Reports list.
Reports list
The Reports list provides information about all of the reports listed in the grid.
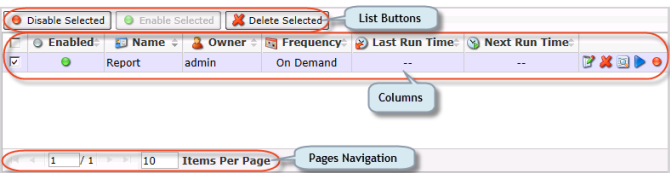
Columns:
- Check box - Allows you to select the items in the list.
- Enabled - Graphically indicates the Report status (Enabled or Disabled). If the icon is green, the Report is enabled. The red icon is used for disabled Reports.
- Name - Displays the unique name of the Report.
- Owner - Shows the Report owner.
- Frequency - Shows recurrence selected for running the Report (On Demand, Minutely, Hourly, Daily, Weekly, Monthly, or Yearly).
- Last Run Time - Displays date and time when the Report was generated last time.
- Next Run Time - Displays date and time when the Report will be generated next time according to the schedule.
- Actions - This column contains icons which provide access to actions over the corresponding Report.
- Edit - Allows you to access the Report properties window in order to change the properties. See Change report properties.
- Delete - Permanently removes the Report. See Delete reports.
- Preview - Opens the last generated report in a preview window. See Preview reports.
- Run Now - Generates the Report and sends it to the specified emails. See Generate reports.
- Disable/Enable - Makes the selected Report disabled. The Report will not be generated at the scheduled time. See Disable reports.
List Buttons
The buttons allow work with one or several items selected in the Reports list.
- Disable Selected - This button allows you to disable the selected Reports in the list. See Disable reports.
- Enable Selected - This button allows you to enable the selected Reports.
- Delete Selected - This button allows you to remove the selected Reports from the list. See Delete reports.
Page Navigation
The Page Navigation pane allows you to divide the Reports screen into pages by specifying the desired number of items per page. Various buttons and fields can be used to navigate from one page to another.
- Arrows - Click one of the following buttons to move forward and backward through the pages.
- First - Go to the first page.
- Previous - Go to the previous page.
- Next - Go to the next page.
- Last - Go to the last page.
- Page Number - Enter the page number and press Enter to jump to the entered page. The total number of existing pages displays in the pane.
- Items Per Page - Define how many items to display per page in the Reports list. Unless this number is changed, 10 items automatically display per page. To display more or fewer items per page, enter the number of items in this field and press Enter. The maximum number of items per page is 25.
Details pane
This pane provides detailed information about the Report selected in the list. There are four tabs.
- Summary
- Viewers
- Recipients
- Filters

Note
You can collapse/expand the details of a block by clicking on the header of the corresponding block.
Summary Tab
The Summary tab provides the following blocks of information about the selected report.
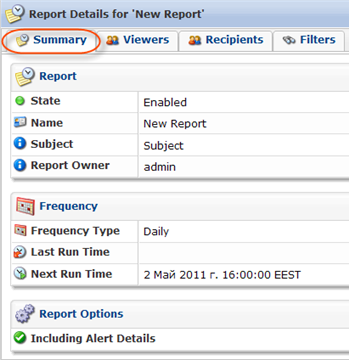
Report
- State - Graphically indicates the Report status ("Enabled" or "Disabled"). If the icon is green, the Report is enabled. The red icon is used for disabled Reports.
- Name - Displays the unique name of the Report.
- Subject - Displays the Subject specified in the Report properties.
- Owner - Displays the Report owner.
Frequency
- Frequency Type - Shows recurrence selected for running the Report (On Demand, Minutely, Hourly, Daily, Weekly, Monthly, or Yearly).
- Last Run Time - Displays date and time when the Report was last generated.
- Next Run Time - Displays date and time when the Report will be generated next time.
Report Options (Advanced, Enterprise Edition)
- Sending Empty Reports - Graphically displays whether the option of "Sending Empty Reports" is activated for the selected Report. The green icon indicates the enabled option.
- Including Alert Details - Graphically shows whether the option of "Including Alert Details" is activated for the selected Report. The green icon indicates the enabled option.
- Specifying From Address - Shows the address that is displayed in the from field of the recipient's mail.
Viewers Tab

Recipients Tab
Shows the list of recipients to which the generated Report will be sent.

Filters Tab
Shows Filters applied to the Report. The filters allow you to specify the information which will be included in the generated Report.
