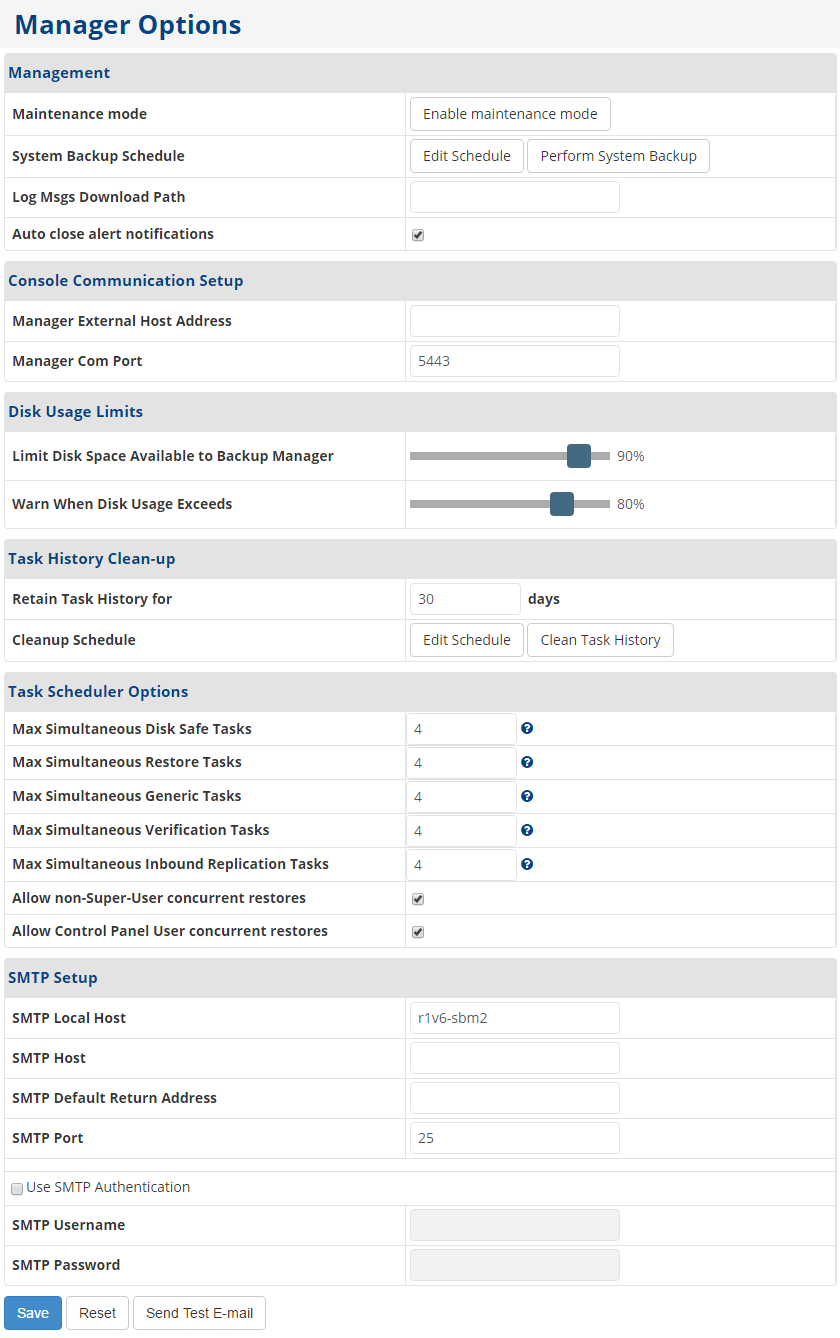
The Manager Options screen in Server Backup Manager is used to configure options such as disk usage limits, task scheduler options, and SMTP setup. You can also enable maintenance mode, edit the system backup schedule, and configure task history options from this screen. To access the Manager Options screen, click Advanced Options in the Main Menu and select Manager Options.
The following sections display on this screen:
Management
Enable Maintenance Mode. Click this button to enable maintenance mode. Enabling maintenance mode stops the task scheduler, but still provides time for currently-running tasks to finish. No new tasks begin while maintenance mode is enabled. For more information about maintenance mode, click here.
Edit Schedule. Click this button to edit the system backup schedule. The Edit System Backup Schedule window displays.
Perform System Backup. Click this button to immediately perform a system backup.
Log Msgs Download Path. In this field, enter the download path for log messages.
Auto Close Alert Notifications. Select this check box if you want to automatically close alert notifications when they display in the Alerts menu at the top of every SBM screen.
Console Communication Setup
Manager External Host Address.
Manager Com Port.
Disk Usage Limits
Limit Disk Space Available to Backup Manager. This option defines how much free space is left. This is an effective limit defined in percents of the device volume. If the limit is reached, then the system forbids generating new recovery points. The replication is interrupted and failed.
Warn When Disk Usage Exceeds. This is a warning level where users are informed they are close to reaching their effective limit. The level is also defined in percents of the device volume. This limit is usually a value less then the Limit Disk Space Available to Backup Manager.
Task History Clean-Up
Retain Task History for X Days. Define the number of days you want to keep task history logs. The default value is 30 days.
| Tip This default value may differ depending on the free space available. |
Cleanup Schedule. Allows you to set the task history clean-up options. Click Edit Schedule to select from the following triggers:
- Trigger Type. Recurrence selected for the task clean-up. Options include Never, Hourly, Daily, Weekly, Monthly, and Yearly.
- Starting Minute. Hourly and Daily only. The exact minute of the task clean-up start time each hour.
- Hours of Day. Daily only. The exact hour(s) each day of the task clean-up start time.
- Days of Week. Weekly only. The day(s) of the week of the task clean-up start time.
- Days of Month. Monthly only. The day(s) of the month of the task clean-up start time.
- Start Time. Weekly, Monthly, and Yearly only. The exact hour and minute of the task clean-up start time each day of the month.
- Day of Month. Monthly and Yearly only. The date of the month(s) of the task clean-up start time.
- Months of Year. Yearly only. The month(s) of the year of the task clean-up start time.
Task Scheduler Options
The Task Scheduler Options allow you to change the Cron task limits. The following options allow you to set the maximum allowed number of tasks executing at the same time.
- Max Simultaneous Disk Safe Tasks. The maximum allowed number of concurrent tasks which refer to the disk safes, including policy, merge, and vacuum tasks. The default value is 4.
- Max Simultaneous Restore Tasks. The maximum allowed number of concurrent restore tasks, including file, bare metal, and database restores. The default value is 4.
- Max Simultaneous Generic Tasks. The maximum allowed number of concurrent genetic tasks, which are tasks that are neither policy nor restores. The default value is 4.
- Max Simultaneous Verification Tasks. the maximum number of concurrent verification tasks, which are not policy, restore, nor generic. The default value is 4.

Tip
These default values may differ depending on the free space available.
SMTP Setup
The following options are used for the Email Reporting Tasks. See Reporting.
- SMTP Local Host. SMTP local host name used to deliver email reports.
- SMTP Host. SMTP hosts name used to deliver email reports.
- SMTP Default Return Address. The email address to which bounce messages are sent. Some ISPs use the return address as a means of verifying that a user is allowed to send mail through their servers. If it is set incorrectly, your mail may be rejected. The return address is not normally visible in message headers, and it is not necessarily the same as the From: address or Reply-To: address in the message headers.
- SMTP Port. Defines the port of the outgoing mail server (SMTP).
- Use SMTP Authentication. Check this box to activate SMTP authentication. If you select this option, complete the following fields:
- SMTP Username. Define the username for SMTP authentication.
- SMTP Password. Define the password for SMTP authentication.
Note
For Gmail users who have activated the SMTP authenticated connections, the "Less Secure" setting is required. For information on activating the "Less Secure" setting in Gmail, click here.
Click the Save button to save all changes made on the Manager Options screen. Click the Reset button to revert to the previous configuration that existed before any changes were made.
Sending a Test E-mail Message
Use the following steps to send a test e-mail and verify your settings.
- Click the Send Test E-mail button in the Manager Options window. The Send Test E-Mail window displays as shown in the following image.
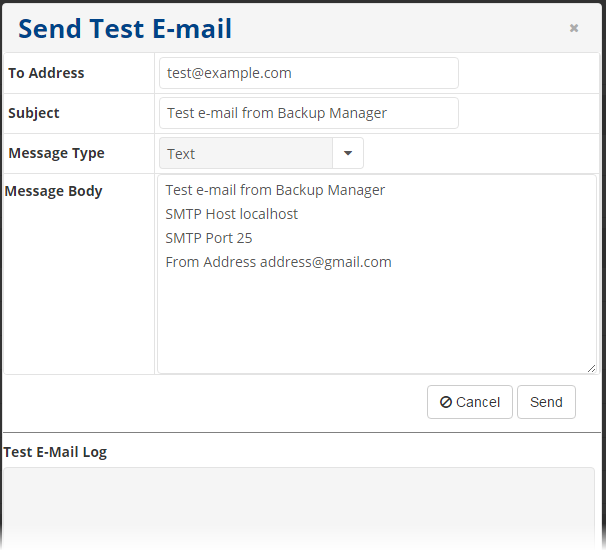
- Enter a valid email address in the To Address field.
- Verify the default field entries, and then click Send. The Test Email Log area displays a detailed report of the process.
Enabling Maintenance Mode
Server Backup Manager allows you to enable maintenance mode to stop the scheduler, but still provide time for currently-running tasks to finish. No new tasks begin while maintenance mode is enabled.
If you attempt to run a task while in maintenance mode, SBM displays an error message. Regularly-scheduled tasks will not run during this period.
To enable maintenance mode, click the Enable Maintenance Mode button on the Manager Options screen. The SBM main heading will turn red to signify that you are operating in maintenance mode. 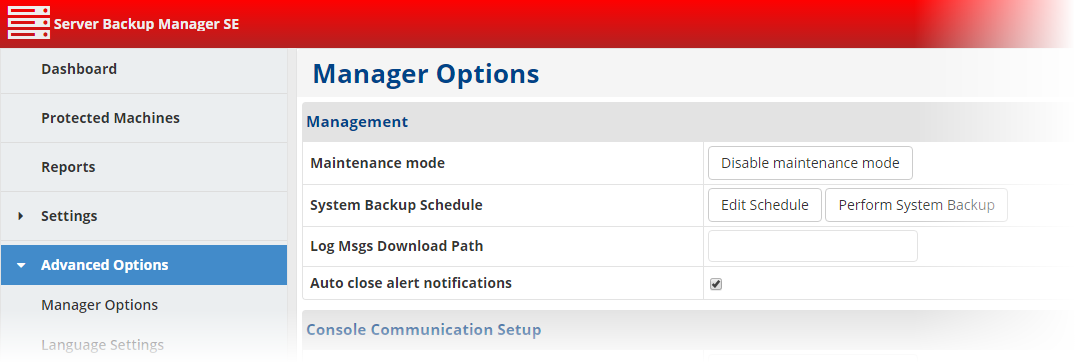
To disable maintenance mode, return to the Manager Options section and click the Disable Maintenance Mode button.