This document provides information on how to move/migrate Server Backup Manager from one physical computer to another.
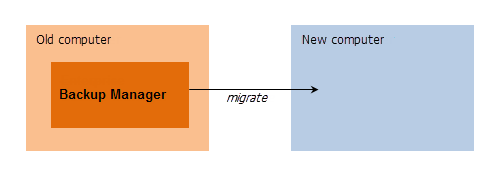
A Backup Manager migration involves the following elements:
- Old Computer - The physical machine where you have your current Backup Manager installation.
- New Computer - The physical machine to which you are moving (migrating) your Backup Manager.
Why migrate?
Some of the possible reasons why it may become necessary to migrate the Backup Manager:
- Your current computer is having hardware problems and is no longer reliable.
- During backup/restore procedures, it becomes clear that processing power is not sufficient to perform all tasks quickly and reliably; however, the current computer cannot be scaled up any further.
- You need to move the Server Backup Manager from one operating system to another.
Follow the instructions below to move/migrate a Server Backup Manager installation to a new computer.
| Note It is assumed that you have prepared a New Computer according to these requirements: |
- Step 1 - Installing a new Backup Manager
- Step 2 - Shutting Down Backup Manager Service
- Step 3 - Removing "log," "config," and "data" on the New Computer
- Step 4 - Copying "log", "config," and "data" from the Old Computer
- Step 5 - Copying the Volumes and Disk Safes to the New Machine
- Step 6 - Starting the Backup Manager on the New Computer
- Step 7 - Reactivating the License key
- Step 8 - Restarting the Backup Manager on the New Computer
Step 1 - Installing a new Backup Manager
First, install Server Backup Manager on the new computer. See:
Step 2 - Shutting Down Backup Manager Service
Stop the Backup Manager on the New Computer.
Linux Installations
If your Backup Manager is installed on Linux, then the Linux Backup Manager can be stopped using this command:
The "cdpserver stopped" message will appear.

Windows Installations
If your Backup Manager is installed on Windows, then the Windows Backup Manager can be stopped via the "Services" utility. Perform the following steps.
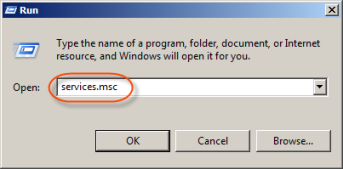
1. Click the Windows "Start" button, and then start the "Run" program. The "Run" window will be opened.
Type in the "services.msc" command, and then click OK.
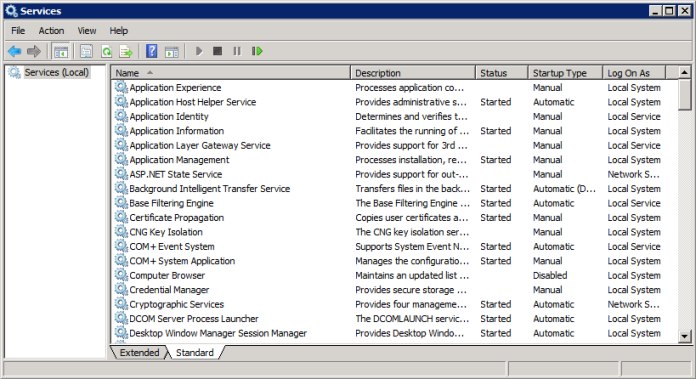
2. The "Services" window will be opened.
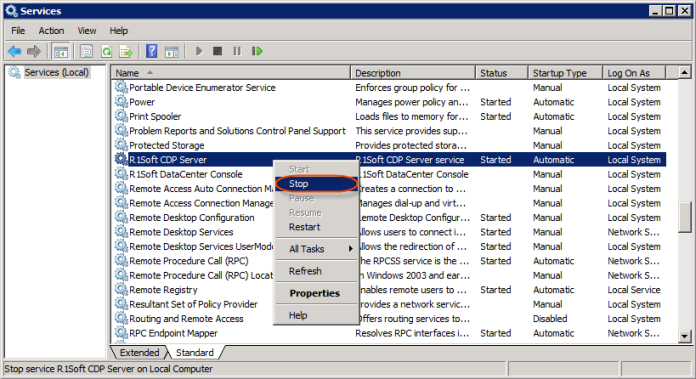
3. Find the "Backup Manager" service. Right-click on it, and then choose "Stop" in the drop-down menu. The service will be stopped.
Step 3 - Removing "log," "config," and "data" on the New Computer
Perform the following activities on the new computer.
Linux Installations
First, open a terminal program on your Linux computer. Go to the Backup Manager's location, and list all files and folders using these commands:
Remove the log, config, and data folders using the rm command:
| Note Use the rm -r command with caution; if you mistype the directory, the command will delete everything, without asking for confirmation. Find more information here: Using rmdir and rm commands |

Step 4 - Copying "log", "config," and "data" from the Old Computer
In this step, you will copy the "log", "config," and "data" folders from the Old Computer to the New one.
Linux Installations
If your new computer has an SSH daemon running, you can use the scp command for copying the "log," "config," and "data" folders:
Explanation of this command:
- /path/to/folder/ - The Old Computer's path to the folder being copied. By default, it is /usr/sbin/r1soft/data/ for the "data" folder.
- user - The user from the New Computer who has the write permission to the destination folder. In this case, the user is root.
- targethost - The New Computer's hostname or IP address.
- /target/path/ - The New Computer's path to the folder. By default, this path is "/usr/sbin/r1soft/."
Type this command correctly, and then enter yes to confirm that you want to continue connecting. Then enter the user's password.

Once the folder has been copied, it can be found in the new computer.

| Note If you are not sure about any part of this step, carefully read the information on this page: Remote file copy program |
Windows installations
Current versions of the Server Backup Manager are only available for the Linux operating system. In order to copy files and directories from a Windows system to a Linux system, we recommend using a 3rd party SCP utility such as WinSCP. This program should be installed on the Old Computer running Windows. Instructions for using the 3rd party utility should be provided by the vendor.
First, open the WinSCP program or another file browser, and go to C:\Program Files\Idera Server Backup (this is the default path, but the Backup Manager may also be located on the D: drive).
Then, choose the "conf," "data," and "log" folders and copy them to the New Computer at "/usr/sbin/r1soft/".
Step 5 - Copying the Volumes and Disk Safes to the New Machine
| Note Disk Safes from older versions of the SBM are always compatible with newer SBM installations. Disk Safes from newer SBMs should not be moved to older SBM installations. Contact R1Soft Support if there are any reasons why you may need to move a Disk Safe from a newer SBM to an older SBM version. |
Disk Safes are most commonly stored in Volumes, which appear on the file system as folders containing multiple Disk Safes. Volumes must be copied intact. Disk Safes can also be stored outside Volumes, but this is not recommended by R1Soft.
Ideally, Volumes and Disk Safes will be copied to the same path location between the Old Computer and New Computer. However, Volumes and Disk Safes may be relocated to alternate paths on the New Computer. If the paths have changed, the SBM configuration database will need to be updated to reflect this new path.
To assist with this path modification, R1Soft has produced a command line utility called the SBM Path Configuration Tool.
To use this tool, simply download the .zip archive at http://repo.r1soft.com/contrib/sbm-pathconf-1.0.zip, place the tool inside the "/usr/sbin/r1soft" directory, and follow the instructions contained inside the README file bundled with the tool.
Further information concerning Disk Safe copying can be found here: Copy or move Disk Safes
Step 6 - Starting the Backup Manager on the New Computer
Perform the following activities on the new computer to which you are going to migrate.
Linux Installations
The Linux Backup Manager can be started using this command:

The "cdpserver started" message will appear.
You can also check whether this service has been started by typing the cdp-server status command and pressing <Enter>.

Step 7 - Reactivating the License key
The License key must be reactivated on the new computer to which you are going to migrate. Reactivation is necessary and must be performed to use your Server Backup Manager.
All information concerning the License Key Reactivation can be found here: Reactivate the Server Backup Manager license
Step 8 - Restarting the Backup Manager on the New Computer
Perform the following activities on the new computer. This procedure is performed after the disk safes are copied.
All information concerning the Backup Manager restarts can be found here: Restart Backup Manager.